No Bake Lady Finger Cake with Lemon Curd [Recipe]
I’m still not ready to let go of the summer feeling and this cake is the last take on it before the fall comes. I used lady fingers because I didn’t want to bake it, so the actual preparation lasted about 15 minutes – amazing, right? You can never have too many recipes for quick, easy, and delightful desserts, so I’m sharing mine for No Bake Lady Finger cake with you.
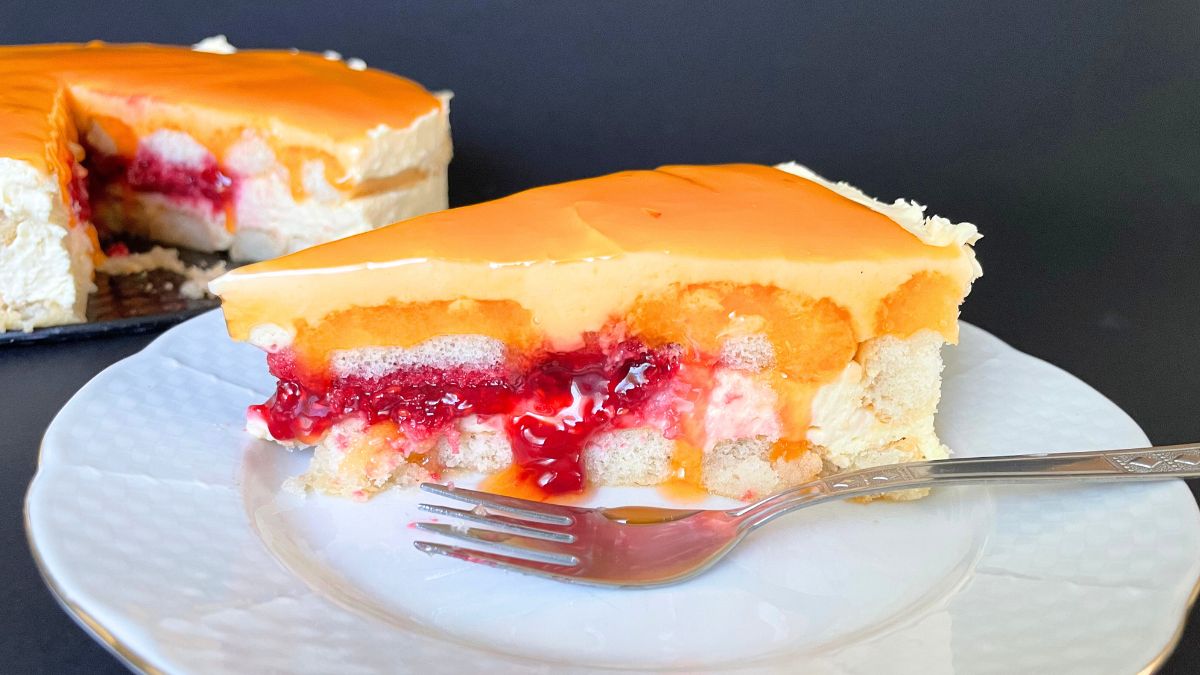
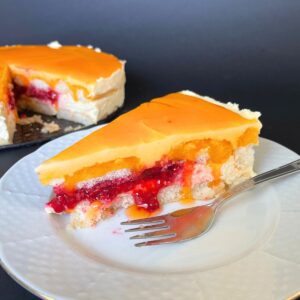
The cake is so refreshing that feels more like a crossover between ice cream and sorbet. It is probably thanks to lemon curd. I wanted that cool, tangy, not-too-sweet vibe and got exactly that! It’s not tiramisu, but the process is almost the same, with only a few different ingredients. The first bite teleported me to the Italian coast with staple lady fingers, fresh lemons, and fruity raspberries, so I’ll continue daydreaming…
What Makes this No-Bake Lady Finger Cake Special?
Lady fingers are like a blank canvas and they pair with so many different flavors! I chose a lemon and raspberry combo this time because I love sour desserts and I made everything according to my taste this time. I layered the taste of lemon by dipping ladyfingers in the fresh juice, making lemon curd, and finally drizzling the lemon sauce on top.
The lemon sauce really brings the tanginess to the table, so you can definitely skip it for a milder taste. When it comes to raspberries, I made a sauce from scratch and left it a bit runny as it looks superb when they pour over the cake slice. Chill it well before serving, because it brings out all the flavors and you’ll get clean cuts. It is fresh to eat for about 5 days and the longer it sits, the more delicious it is!
How to Make No-Bake Lady Finger Cake?
When I got an idea for this cake, I was thinking about the simplest ways to make fine-quality lemon curd and I think I cracked the code. The curd is the star of the cake, so it is essential for it to be impeccable. Here is everything you need for the cake!
- Ladyfingers – Ladyfingers make a fantastic base for the cake. With proper dipping, they will be perfectly moist without being soggy.
- Lemon – I use lemon in 3 components of the cake: juice for dipping, zest for the curd, and juice again for the sauce. Just make sure you’re using lemons with edible peel and give them a proper wash.
- Raspberries – I used fresh raspberries for the sauce, but I think jam would be okay, as well.
- Heavy cream – I like to add heavy cream to the curd so it has a spreadable, silky consistency.
- Milk – Milk also goes in the curd. I find a 1:1 ratio between milk and heavy cream gives the best results.
- Sugar – I use confectioners’ sugar for the curd and regular white sugar for the rest of the cake.
- Corn starch – You’ll need corn starch for both curd and lemon sauce. You can use it for the raspberry sauce, as well, but I prefer to add instant raspberry pudding instead.
- Mascarpone – I use mascarpone to soothe the lemon flavor, plus it is a staple in tiramisu and I wanted some variation on it. Any other cream cheese would work here, as well.
Step 1: Making the Lemon Curd
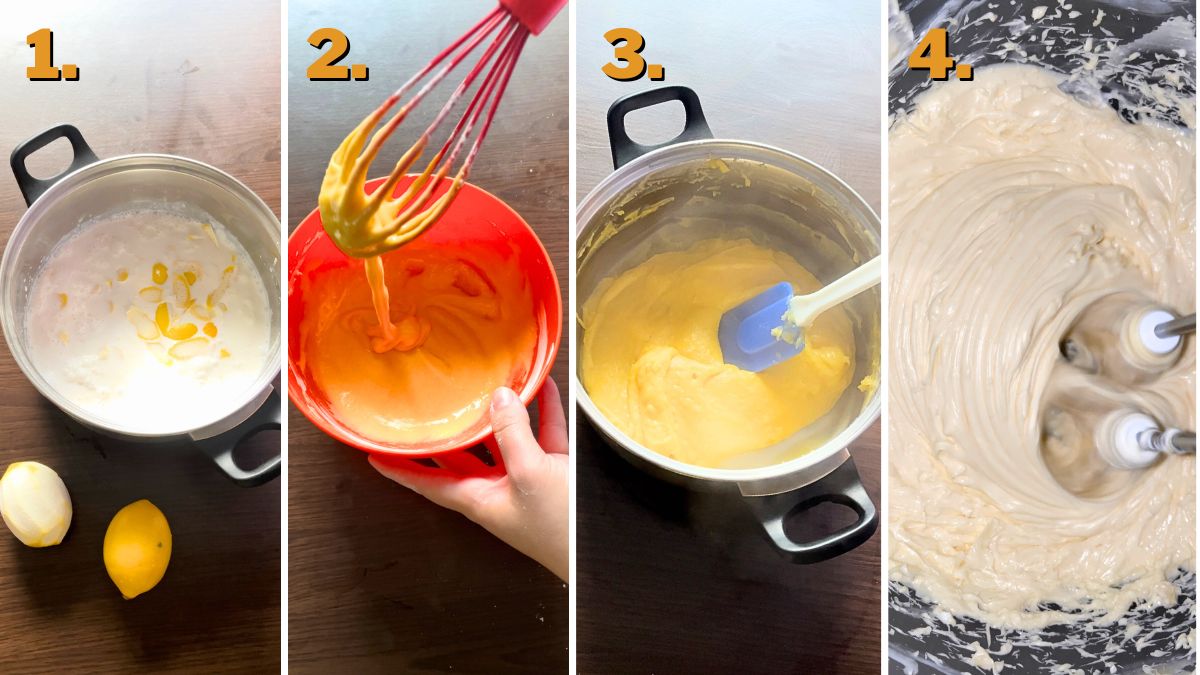
This curd is super easy to make! In a thick-bottomed pot, combine milk and heavy cream and add lemon peel. It’s better if you use the top layer only, leaving the white part (I pinned a picture below) as it won’t taste bitter that way. Heat it over medium until starts to boil. That’s just enough time for the liquid to become infused with lemon.
In the meantime, combine cornstarch and powdered sugar with egg yolks. Mix it well, so there are no lumps left. The mixture will be thick, but smooth. Remove the pot from the stove the moment it reaches the boiling point and strain it into the bowl with the yolk mixture.
It’s the fastest way to remove all the lemon peel. Use a whisk to combine everything and return to the pot. Now, you need to cook it over medium heat and mix constantly!
I always use the silicone spatula for this, as the mixture tends to stick to the bottom and silicone just scrapes off everything. Quickly, the mixture will become thick, creamy consistency, and easy to spread. It took me about 5 minutes, whatsoever, it was really quickly done.
Remove from the stove and cover it with plastic foil, but directly over the curd, so it doesn’t form a thick film on top (like pudding). Leave it to chill at room temperature, or store it in the fridge and use it later. Of course, the lemon curd will stiffen even more after cooling, so you’ll have to mix it until it’s creamy.
I like to mix mascarpone cheese in a separate bowl and add a bit of powdered sugar if needed. This time, I added a tablespoon as the lemon and raspberries are both pretty tangy. Combine lemon curd with mascarpone into the smooth, even cream and that’s it!
Step 2: Making the Raspberry Filling
Frozen or fresh, any raspberries are fine. I used frozen ones this time. Place them in the pot, sprinkle with sugar, and simmer over medium heat. If you see that all of the juices evaporated, add some water. I simmered them for 2-3 minutes only; it was enough for them to defrost.
Also, I prefer to use instant raspberry pudding to thicken up the sauce, but cornstarch is fine, too. Mix a teaspoon of whichever you’re using with some water and add to the pot. Let it simmer for a minute top, and let it cool along with the lemon curd. I like to do both at the same time. 🙂
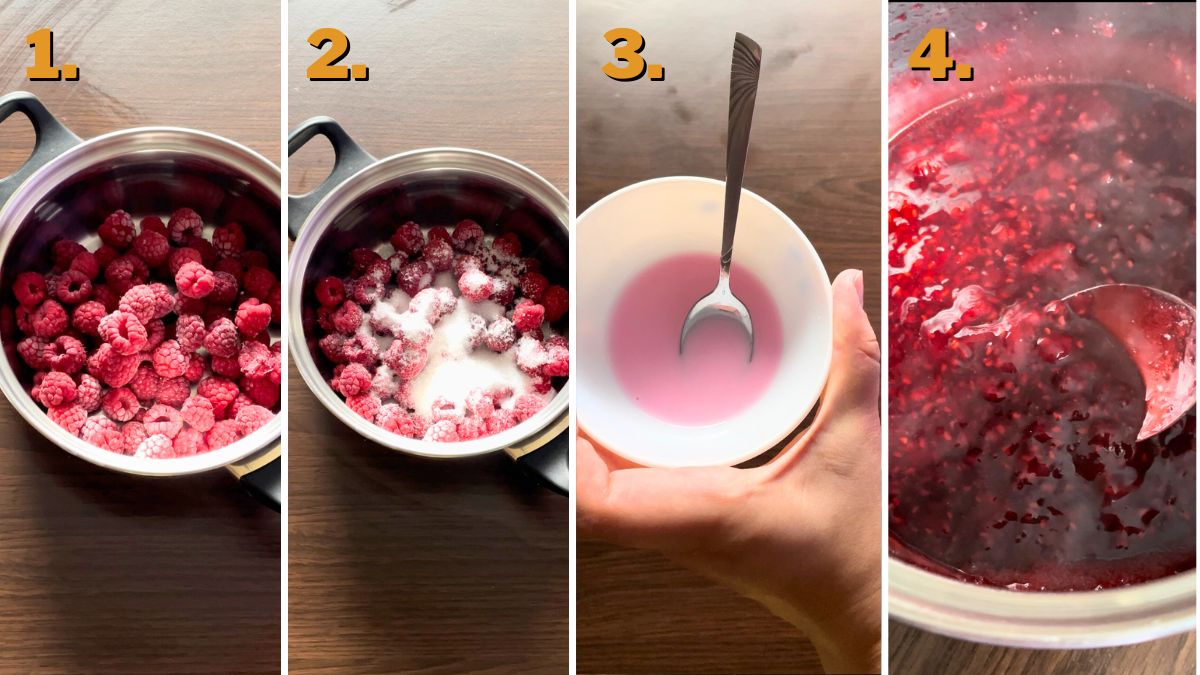
Don’t forget to cover it with plastic foil. Also, don’t place this sauce in the fridge as it will thicken up more than it should. It’s better to cool it down to room temperature, so you’ll be able to pour it – it is easier like this.
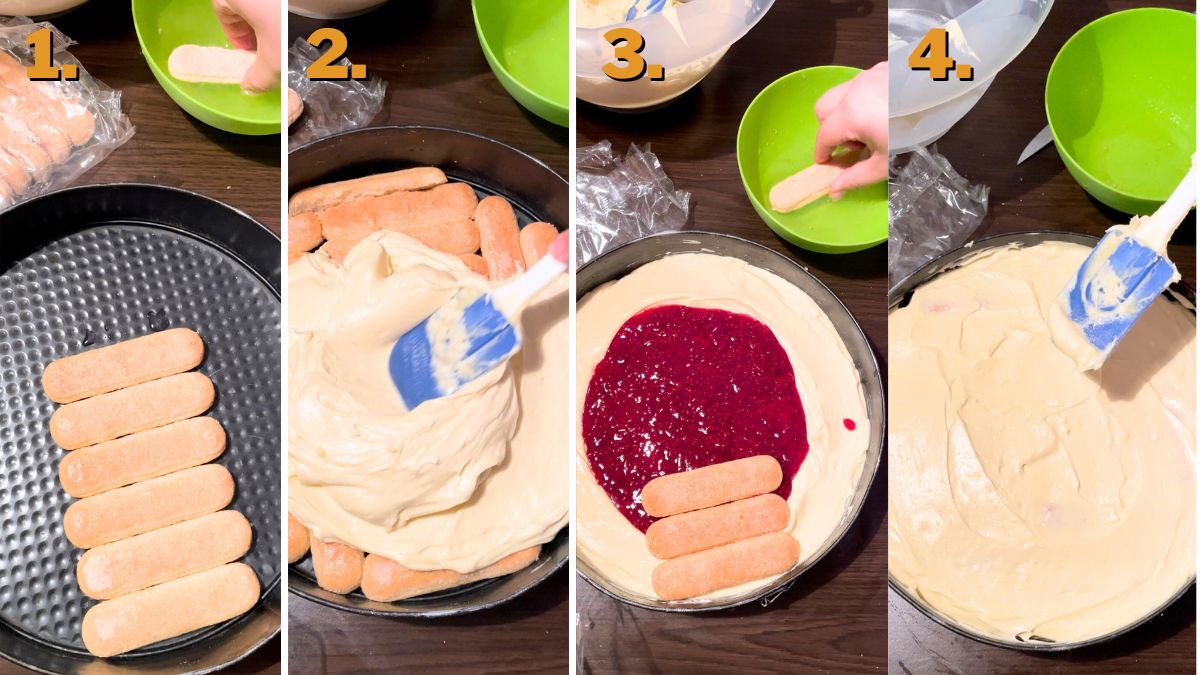
Step 3: Assembling the Cake
Merry freshly squeezed lemon juice with water and sugar, and mix until all the sugar dissolves. You will be using this for dipping, so that’s why it has more sugar than regular juice. I opted for a springform pan this time, but my regular is a casserole dish, it doesn’t really matter.
Dip each ladyfinger into the lemon juice, but do it quickly otherwise, they will be soggy. Arrange them on the bottom of the pan and cover with 2/3 of lemon curd. I like to make a shallow dent with a spoon for the raspberry sauce, as it stays put that way and won’t overflow.
Pour all of it in the dent and go with another layer of ladyfingers dipped in lemon juice. Smear the rest of the lemon curd nicely.
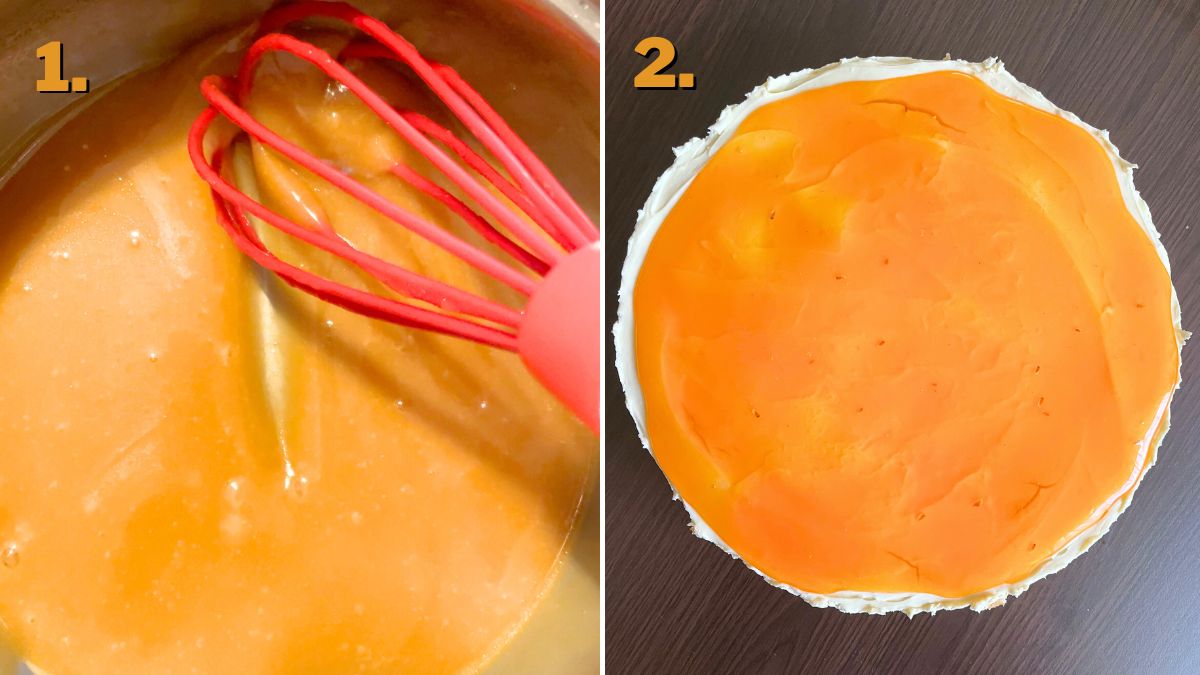
Step 4: Making the Lemon Sauce
Now, I like to make the final lemon sauce to top the cake but you don’t really have to. This is just for additional zing, but it’s my favorite thing here! Combine sugar and freshly squeezed lemon juice and bring them to a boil.
Dissolve cornstarch in water and add to the pot. Let it simmer a bit, no more than a minute. It should be liquid as it will thicken later, so don’t worry. Let it cool a bit and drizzle on top. I added a bit of powdered orange color because I didn’t have yellow, but that one is definitely better. I just wanted a pop of color. 🙂
How to Store No-Bake Lady Finger Cake?
No Bake Ladyfinger Cake is outstanding when left overnight. It’s always better when ladyfingers absorb the moisture from curd and raspberry. I keep it in the fridge for no more than 4 days, because of the eggs. Swathe it in plastic wrap or place it in an airtight container. It can’t be frozen.
No Bake Ladyfingers Cake Recipe
Equipment
- 1 springform pan
Ingredients
Lemon Curd
- 1 cup milk
- 1 cup heavy cream
- 2 lemons (use peel only)
- 1 ⅓ cups powdered sugar
- ½ cup cornstarch
- 6 egg yolks
Raspberry Filling
- 2 cups raspberries
- 2 tbsp instant pudding (or cornstarch)
- 1 cup sugar
Lemon Sauce
- 1 cup lemon juice
- ¾ cup sugar
- 1 tbsp cornstarch
Crust
- 1 cup sugar
- ½ cup lemon juice
- 1 cup water
- 14 oz ladyfingers
Instructions
Making the Lemon Curd
- In a thick-bottomed pot, combine milk and heavy cream, and add lemon peel. Heat it over medium until it starts to boil.
- In the meantime, combine cornstarch and powdered sugar with egg yolks. Mix it well, so there are no lumps left. The mixture will be thick, but smooth.
- Remove the pot from the stove the moment it reaches the boiling point and strain it into the bowl with the yolk mixture. Use a whisk to combine everything and return to the pot. Now, you need to cook it over medium heat and mix constantly for about 5 minutes! The cooked mixture is thick, creamy, and easy to spread.
- Remove from the stove and cover it with plastic foil, but directly over the curd. Leave it to chill at room temperature.
- Mix chilled lemon cream with mascarpone cheese and more powdered sugar if needed until smooth.
Making the Raspberry Filling
- Place raspberries in the pot, sprinkle with sugar, and simmer over medium heat. If you see that all of the juices evaporated, add some water. Simmered them for 2-3 minutes only.
- Mix a tablespoon of instant raspberry pudding with some water and add to the pot. Let it simmer for a minute top, and let it cool along with the lemon curd.
- Cover it with plastic foil and chill to room temperature.
Assembling the Cake
- For the dipping, merry freshly squeezed lemon juice with water and sugar, and mix until all the sugar dissolves.
- Dip each ladyfinger into the lemon juice, but do it quickly otherwise, they will be soggy. Arrange them on the bottom of the pan and cover with 2/3 of lemon curd.
- Make a shallow dent with a spoon for the raspberry sauce, as it stays put that way and won’t overflow. Pour all of it in the dent and go with another layer of ladyfingers dipped in lemon juice. Smear the rest of the lemon curd nicely.
Making the Lemon Sauce
- Combine sugar and freshly squeezed lemon juice and bring them to a boil.
- Dissolve cornstarch in water and add to the pot. Let it simmer a bit, no more than a minute. It should be liquid as it will thicken later. You can add yellow food color, as well.
- Let it cool a bit and drizzle on top.
Notes
Before diving into the nutritional details, please review our Nutritional Disclaimer page for important context and clarifications.