

How to Turn a Boxed Cake Mix Into a Patriotic Fourth of July Layer Cake

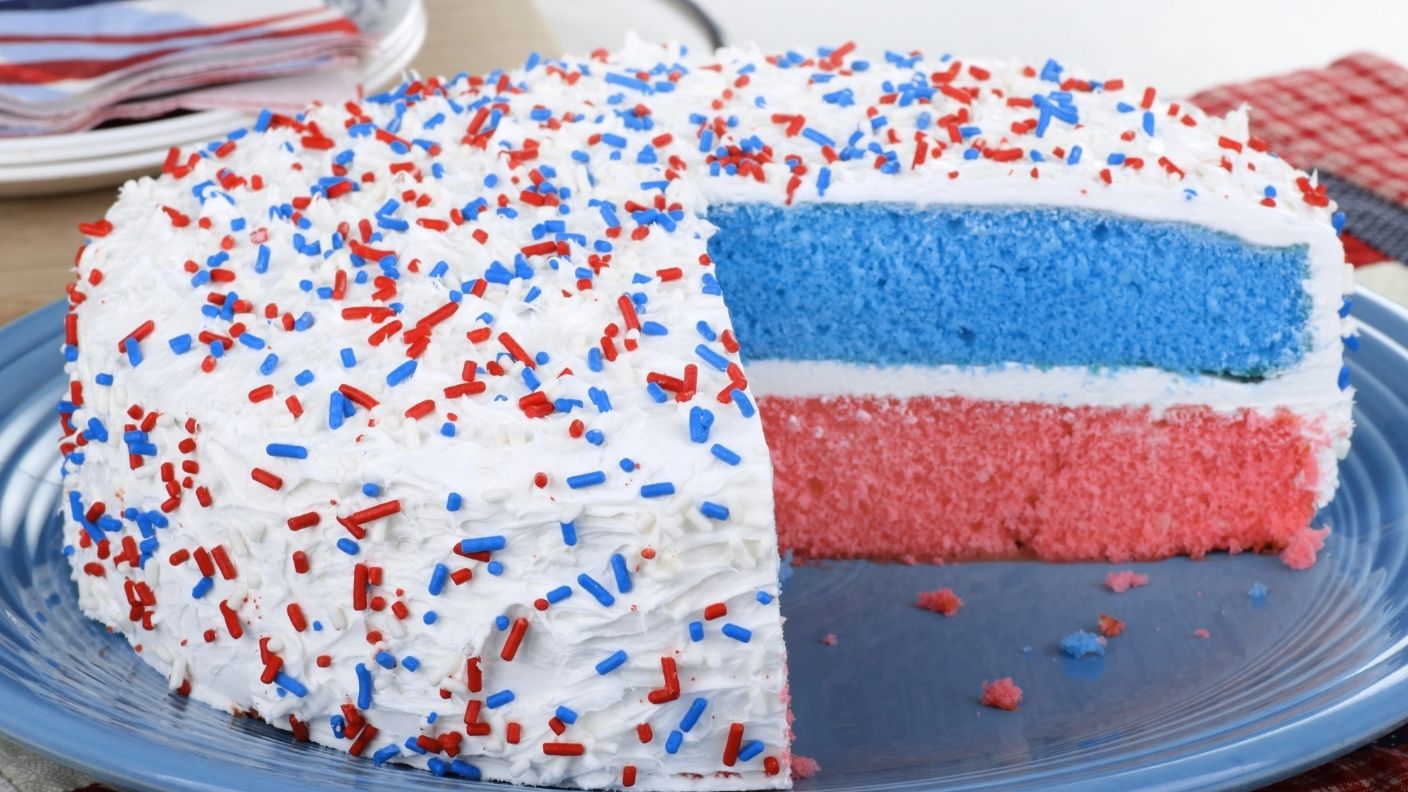

Here’s a little secret: some of the most impressive-looking celebration cakes start with a box of store-bought cake mix. This Fourth of July layer cake — with its dramatic red, white, and blue interior revealed when you cut the first slice — is proof.
The outside is frosted in swooping white buttercream and buried under a blizzard of red and blue jimmies. The inside? Three distinct colored layers that make the whole table gasp. And the whole thing starts with two boxes of Betty Crocker Velvety Vanilla Cake Mix.
Why Boxed Mix Is Actually the Smart Choice Here
When you’re coloring cake batter, a reliable, consistent base matters more than a from-scratch recipe. Betty Crocker Velvety Vanilla — or any similar white or vanilla boxed mix — gives you a neutral, light-colored batter that takes gel food coloring beautifully. It also has a soft, moist crumb that holds up well to stacking and frosting. You’re not cutting corners; you’re working smarter.
The real effort here goes into the coloring, the layering, and the frosting — which is where all the visual drama lives anyway.
What You’ll Need
For the cake layers:
- 2 boxes Betty Crocker Velvety Vanilla Cake Mix (or similar white/vanilla boxed mix) — plus whatever ingredients the box calls for (typically eggs, oil, and water)
- Red gel food coloring — gel only; liquid food coloring will water down the batter and give you a washed-out pink instead of a true red
- Blue gel food coloring — royal or sky blue gel works best for a vivid, clean color
For the white frosting:
- Unsalted butter — softened; the base of a classic American buttercream
- Powdered sugar — sifted, for a smooth, lump-free frosting
- Heavy cream — for a silky, spreadable consistency
- Vanilla extract — keep it clear or light-colored so the frosting stays bright white
- Pinch of salt
For decorating:
- Red and blue jimmies (sprinkle rods) — the long rod-style sprinkles you can see covering the cake in the photo; they give better coverage than round nonpareils
- Extra sprinkles for the top — pile them on generously
What to Serve It With
- Vanilla ice cream — a classic pairing that never misses
- Fresh strawberries and blueberries on the side to echo the color theme
- Lemonade or sparkling berry punch — light and summery alongside a rich frosted cake
- Cold brew or iced coffee — cuts through the sweetness of the buttercream perfectly
Make-Ahead & Storage Tips
- Bake the cake layers up to 2 days ahead — wrap each layer tightly in plastic wrap once fully cooled and store at room temperature
- Make the frosting up to 3 days ahead — refrigerate in an airtight container, then let it come to room temperature and re-beat before using
- Assemble and frost the day before or the morning of — the cake actually slices more cleanly after the frosting has had time to set
- Add the sprinkles after frosting and before refrigerating so they adhere well; they’ll soften slightly overnight but still look great
- Store the finished cake covered at room temperature for up to 2 days, or refrigerated for up to 4 days — bring to room temperature before serving

Recipe: Patriotic Red, White & Blue Layer Cake
Serves: 12 | Prep time: 30 minutes | Cook time: 25–28 minutes per batch | Cooling + frosting time: 2 hours
Ingredients
For the cake layers:
- 2 boxes (15.25 oz each) Betty Crocker Velvety Vanilla Cake Mix (or similar white/vanilla mix)
- Eggs, vegetable oil, and water as directed on the box (for both boxes)
- Red gel food coloring (AmeriColor Red Red or Wilton No-Taste Red recommended)
- Blue gel food coloring (AmeriColor Royal Blue or Wilton Royal Blue recommended)
For the white buttercream frosting:
- 1½ cups (340 g) unsalted butter, softened
- 6 cups (720 g) powdered sugar, sifted
- 4–5 tbsp heavy cream
- 2 tsp clear vanilla extract (use clear to keep the frosting bright white)
- ½ tsp salt
For decorating:
- 1–1½ cups red and blue jimmies (rod-style sprinkles)
Method
Step 1: Prep your pans and oven. Heat the oven to 350°F (175°C), or whatever temperature your box mix specifies. Grease three 9-inch round cake pans, line the bottoms with parchment paper, and grease the parchment too.
Step 2: Mix the batter. Prepare both boxes of cake mix together in one large bowl, following the package directions for both. Stir until smooth and just combined — don’t overmix.
Step 3: Divide and color the batter. Divide the batter evenly into three separate bowls — about one-third in each.
- Bowl 1 (red): Add red gel food coloring a little at a time, stirring thoroughly between additions, until you reach a deep, vivid red. Don’t be shy — the color will fade slightly during baking, so go a shade deeper than you think you need.
- Bowl 2 (white): Leave this bowl completely plain.
- Bowl 3 (blue): Add blue gel food coloring the same way, stirring until you reach a bright, vivid blue.
Step 4: Bake the layers. Pour each colored batter into its own prepared cake pan, spreading evenly. Since you likely only have two ovens racks, bake two layers at once and then the third separately.
Bake for 25–28 minutes, until a toothpick inserted in the center comes out clean and the edges just begin to pull away from the sides of the pan. Repeat with the third layer.
Step 5: Cool completely. Let the cakes cool in their pans on a wire rack for 10 minutes, then turn out and cool completely on the rack — at least 1 hour. Do not attempt to frost or stack warm cake layers.
Step 6: Make the buttercream. Beat the softened butter with an electric mixer on high speed for 3–4 minutes until very pale and creamy. Add the sifted powdered sugar one cup at a time, beating on low after each addition. Add the clear vanilla, salt, and 4 tablespoons of heavy cream. Increase to high speed and beat for 3 minutes until the frosting is fluffy, bright white, and easily spreadable. Add the fifth tablespoon of cream if needed. The frosting should be thick enough to hold swirls but soft enough to spread without tearing the cake.
Step 7: Level the layers (optional but recommended). If any of your cake layers have domed on top, use a serrated knife to trim them flat. This gives you cleaner, more even layers when you stack.
Step 8: Stack and fill the cake. Place the red layer on your serving plate or cake board. Spread a generous, even layer of buttercream on top — about ½ cup. Place the white layer directly on top and press down gently. Add another generous layer of buttercream. Place the blue layer on top.
Step 9: Apply a crumb coat. Using an offset spatula, spread a thin layer of frosting all over the outside of the cake — top and sides. This is the crumb coat: it seals in any loose crumbs so your final layer of frosting stays clean and white. Refrigerate the cake for 20–30 minutes until the crumb coat is firm.
Step 10: Frost the outside. Apply a generous final layer of buttercream all over the cake. For the look in the photo, keep the frosting slightly textured and rustic — use the spatula to create swooping, natural-looking swirls rather than a perfectly smooth finish. This also gives the sprinkles more surface to cling to.
Step 11: Cover with sprinkles. Working over a sheet of parchment to catch the excess, press red and blue jimmies all over the sides and top of the cake. Be generous — the more coverage, the better the effect. Collect any sprinkles that fall onto the parchment and press them into any bare spots.
Step 12: Slice and serve. Refrigerate for at least 20 minutes before slicing so the layers set. When you’re ready to serve, use a sharp knife and cut confidently — the colored layers look most dramatic with a clean, decisive cut.
RELATED ARTICLE: A Guilt-Free 4th of July: Red, White & Blue Yogurt Parfait
